by Military Diva
A few years ago Walt Disney World implemented a system that allows resort guests to complete check-in online. There are several benefits to this process-guest requests are noted and centralized while the need to stop at the resort’s front desk upon arrival is eliminated. So how exactly does one complete online check-in?
The process is actually very simple! If you have used a travel agent such as our preferred agent, Patricia with All for Dreams Travel, they will likely complete online check-in for you. If you have booked on your own, follow the steps below for a successful online check-in process.
To begin, you will need to log in to your “myDisneyexperience” account. Resort guests can begin online check-in 60 days prior to their vacation. Conveniently, this corresponds with the same date on-site guests can begin making their Fast Pass+ selections-Disney’s complimentary ride-time reservation system, available for anyone with a Disney World Ticket. Typically, guests make their Fast Pass+ selections the priority and then return to complete online check-in.
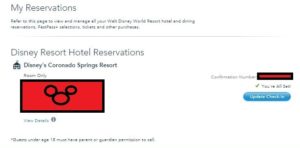
Once logged into “myDisneyexperience”, scroll down to view your plans. Beneath “Enjoy Fast Pass+”, “Make Dining Reservations” and “Set Up Reminders” you should see your resort reservations and blue lettering for “begin online check-in”.
Alternatively, once logged in you can click on “MyDisneyExperience” (top right corner) followed by “My Reservations and Tickets” from the drop down menu. Here you should see your Disney Resort Hotel Reservations showing name of resort, package type, check in and check out dates, room type, guests, confirmation number and most importantly-online check-in (right hand side of screen, below confirmation number).
*I have already completed online check-in so my buttons state “Update check-in”. “Begin online check-in” will be located in the same spots for both methods.
Now the fun begins!
Step 1-Room Notifications
By entering email, phone numbers and contact preferences here, Disney World has the ability to notify guests when their rooms are ready. Many guests receive notice before they even arrive to their resorts, allowing them to head straight to their room (remember, your Magic Bands serve as your room keys!!) If guests don’t receive notice they can still enter their resort, but head to the online check-in desk near the main desk for further instructions. Or, head directly to the parks, Disney Springs or Disney’s Boardwalk until notice is received!
Step 2-Hotel Account Charges
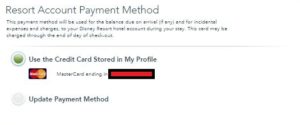
To complete online check-in, guests must accept room charging privileges, list a form of payment and assign a pin for purchases. Doing so allows guests the ability to use their Magic Band for one touch payment at almost every Disney World Park and Resort shop, restaurant, experience or cart. By swiping your Magic Band and entering your four digit pin your purchase will be added to your room charges. At the end of the night, these purchases will be charged to the credit card on file.
To complete this section select “Use the Credit Card Stored in My Profile” and verify the information is correct. Or, choose “Update Payment Method” to use another credit card.
*Guests are not required to use their magic bands for charging, but are required to complete this section to utilize online check-in.
**At this point in time, gift cards can not be listed as payment for room and magic band charges. However, guests can take gift cards to the front desk nightly to pay off any charges that have been applied to the room. Just be sure to do this before midnight, when the charges hit your credit card.
Step 3-Your Resort Arrival
Let Disney World and your resort know when you expect to arrive! Technically rooms are available for check-in at 3:00 pm. But as rooms are vacated and cleaned, Disney is happy to check arriving guests into their rooms. If Disney knows when guests are arriving they can assign and prioritize better. You may be lucky enough to check-in early! Select estimated arrival time from “before 7 am” to “after midnight”, in half hour increments. There is no guarantee your room will be ready at this time, but it will help Disney prepare for your arrival.
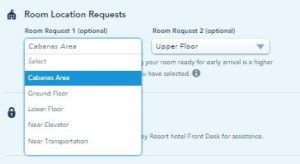
Step 4-Room Location Requests
Yes, you can request to be in a specific building or a particular location! Just like early arrival, there is no guarantee that your request will be met, but it certainly helps Disney accommodate the greatest number of guests. Rooms are already grouped by room rate such as standard, preferred, club level, etc. You will not be able to book a standard room and request a preferred or club level room. But you can make two requests for areas such as ground floor, lower floor, near transportation, near lobby, near elevators, etc. Your list of requests may look a bit different depending on resort, but this is the general idea.
*If you have a more specific request such as accessible rooms or adjoining rooms we suggest you make this request known to Disney during the initial reservation process (or request that your Travel agent notes the request on your initial booking). These requests typically take priority over all other requests, as long as rooms are available.
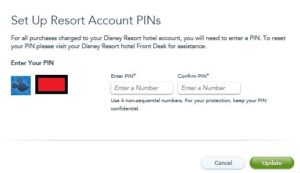
Step 5-Hotel Account Pin
This goes along with Step 2-Hotel Account Charges. Assigning a four digit pin protects your account from fraudulent charges just as an ATM pin would. Each member of your party can use the same pin, or an individual pin can be assigned to each member. Technically, children under the age of 10 cannot use their bands for purchases. They can scan their band, but an adult must enter the pin to approve the purchase (and may have to re-scan their own band). Guests over the age of 10 are granted charging privileges. Online changes to who can charge or to pins already entered cannot be made-these requests must be handled at your resort’s front desk.
Step 6-Magic Band Order
If you haven’t already done so (I personalize my bands on the day I book my package!!), you can customize your Magic Band Order here. Each member of your party can choose a color and personalize the name to be printed on the inside. Currently guests can choose from grey, purple, red, orange, yellow, green, blue or pink colors. Names can be any combination of 9 letters, numbers or keyboard symbols.
Bands customized up to 11 days before resort arrival will be shipped directly to your home. Bands customized after these dates will be available at the front desk or online check-in desk of your resort upon arrival.
Step 7-Reservation Address
Easy enough! Look over the address you provided at booking to confirm everything is correct-you do want your Magic Bands to arrive to your home, right! Click “edit” if any changes need to be made.
Step 7-Read and Agree to the Terms and Conditions
I know many people skip this step and click “I agree”, but there is a lot of useful information pertaining to your reservation and package available here. Humor us and humor Disney by reading before agreeing to the terms. It may save you from hassle and headache in the future!
Finally, click “save” and you are finished! You can now spend your time packing and dreaming of how to spend your first day at Walt Disney World. But don’t forget to stop at the online check-in desk of your resort-your arrival folder with park hours, special events and more will be waiting for you!
Thank you for visiting Tips from the Disney Diva and have a wonderful vacation! We can’t wait to hear all about your experience!
