By Dole Whip Diva
Mickey/Minnie ears are one of the essential accessories for any Disney vacation. I proudly sport my sparkly Minnie ears in the parks because they give any outfit a little Disney flare. I’ve seen pictures of homemade ears all over the place and in the parks, and I’ve even bought a pair myself. Homemade ears offer the chance for Disney fans to customize their look and express their Disney style. I started to wonder if I too could make my own ears, and how much would it cost? Is it worth it? I grabbed my scissors and some fabric and set out to try my hand at ear making. After some toying around with different styles and techniques, I am here to bring you my guide to making ears, and tell you if it’s worth the effort!
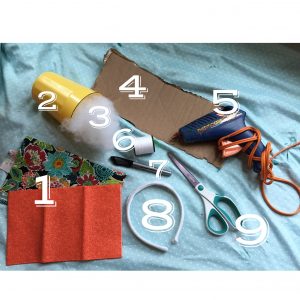
There are a few things you need to make a pair of ears. There’s a lot that you probably have around your house, and I have some tips for finding things pretty inexpensively!
- Fabrics for the ears (and a bow if you are making Minnie ears.)
- A cup to trace the ear shape for. The rim of the cup is how big the ears are going to be so make sure thats a size you will be happy with. You can also google templates and print one out.
- Fiber fill or cotton balls. If you don’t have fiber fill, cotton balls are perfectly fine to stuff your ears.
- Cardboard. I literally just tore a flap off of a box.
- Hot glue gun. An essential for all crafters.
- Needle and thread. If you have a sewing machine then I definitely recommend using it, but hand sewing works too.
- Marker or pen. The part of the fabric you draw on won’t be visible, so any color is fine.
- Headband. The band shouldn’t be too thin because it won’t help the ears stay sturdy.
- Scissors
First, I used the cup to trace pieces of cardboard and fabric. You want to cut around the fabric with about 1 extra inch for sewing. Next, cut 4 fabric circles and 2 cardboard circles.
Take the pattern sides of the fabric and places them together, so the the back sides of the fabric are facing out. Sew along the inner line of the fabric but leave a few inches open. Repeat with the other two fabric circles. Then turn fabric right side out. Next, take the cardboard and line it up on the headband where you want it to be positioned. Then trace along the part of the circle that needs the be cut off and trim this portion off. 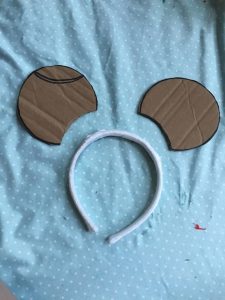
Take one piece of cardboard and place it inside the sewn ear. Position the cardboard so that the cut section of the piece lines up with the open portion of the fabric. Fill the ear with fiber fill or cotton until the ear is fairly solid. Take hot glue and line the inside of the open portion so that the open fabric flaps can be pushed in. Line the top of the flap with hot glue and and push the next piece of fabric on that.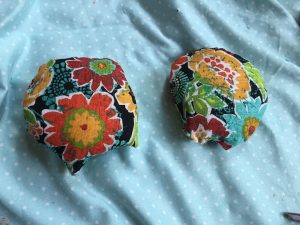
Now its time for the headband! Cover a plain headband in fabric and line up the ears to the desired position. Line the bottom of the ear with hot glue and place on the headband. Hold in place for about 30 seconds until sturdy. Repeat with the other ear. If you are just making Mickey ears, you are done! Add a little hot glue if the ears need to be a little more solid.
Now for the bow! Cut out a rectangular piece of fabric. The bigger the fabric, the bigger the bow. To keep the edges of the bow neat, fold over a small section of each edge and glue it down. Pull the bottom and top halves of the fabric to the middle so that they meet, creating a smooth front.
Bunch up the fabric starting in the middle, and pulling the top and bottom edges to the center. Glue a small piece of fabric the secure the middle of the bow. Glue the bow onto the center of the headband. You can also glue the sides to the ears if you would like the bow to be sturdier, but I like to keep mine loose.
And there you have it! A pair of cute, customizable ears! You can create your ears to fit any character or theme of your choice, and the options are endless. Now the real question is, is it worth it? The only things I had to buy to make these ears were the fabrics and headband. Individual headbands at a craft store run about $4 but I found bunny ear headbands after Easter for only 68 cents each! All I had to do was cut off the bunny ears. Fabrics can range in price. For one pair of ears, I bought 1/4 yard of fabric and had more than enough to make SEVERAL pairs of ears. So in total, both fabrics together cost about $5, and that’s with leftover fabric. Typically, you can buy ears in the park ranging from about $10 for kids ears to $25 for some of the sparkly headbands. I had most of these items already, so that definitely keeps the cost low. These ears didn’t even cost me $6 to make. I will say, I’m a fairly big crafter so making ears didn’t seem like a difficult task for me, but the most difficult part if hand-sewing a circle. So it is worth the time/effort? Yes! I now have a ton of customized ears for a fraction of the price I would pay in the parks. Mine definitely have some flaws because I have not by any means mastered the art of ear making. Don’t be afraid to experiment until you are happy with there result. So go make your own ears. Just don’t be surprised when everyone asks you where you got them!
