by Disney Magic Diva
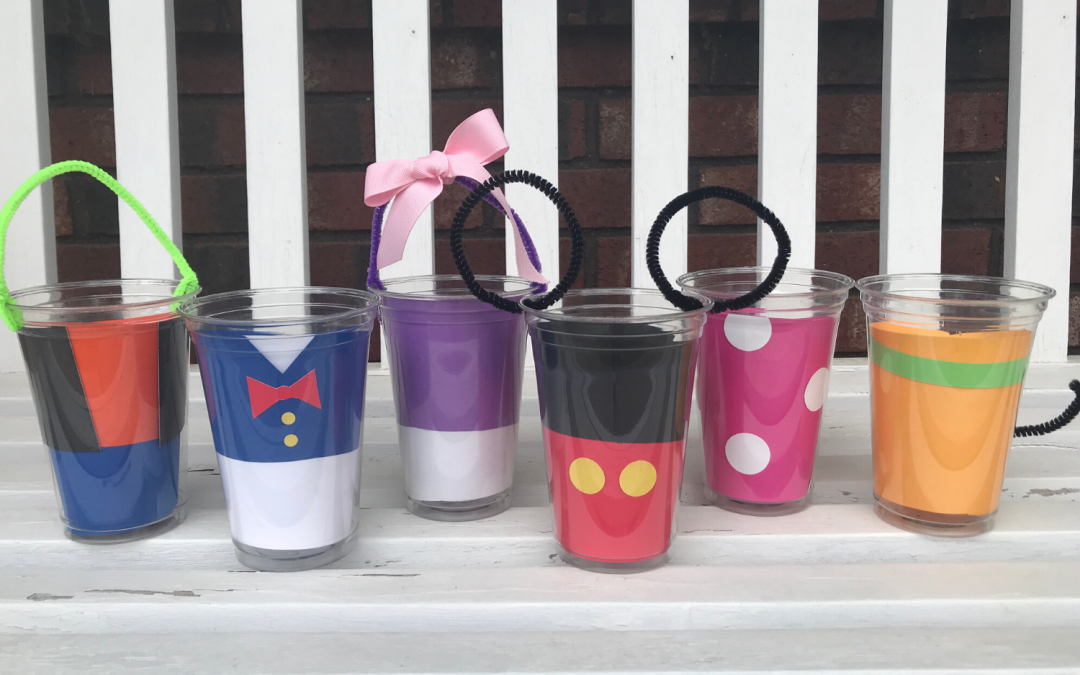
 One of my favorite Spring activities is making May Baskets. To make them extra magical for family and friends, I decided to give them a Disney twist this year. It’s super simple, and a great activity for your kids.
First, though, maybe I should explain the tradition of May Baskets. While they were commonplace in my childhood (eons ago!), today they seem less prevalent. Different families carry-out the tradition in different ways, but basically you create a small “basket” of treats for a friend, sneak it onto their doorstep, ring the doorbell and RUN! If your friend catches you, tradition is they are entitled to give you a kiss. Nowadays, that obviously wouldn’t be recommended, but you still can play along and maybe just give a wave from an acceptable social distance.
Sharing a small treat and showing friends you are thinking of them is especially important today. Everyone is ready for life to be back to normal, and a small gesture of kindness will not only make your friend happy, it will do your heart good too!
It’s important to know that a May Basket doesn’t need to literally be a “basket.” I’ve seen May Baskets made from paper plates, folded cardstock, empty ice-cream cones – really anything you can imagine!
I wanted to create May Baskets that would be Disney-inspired, but not completely over-the-top Disney. Think Disney-bounding. I also wanted something super simple that wouldn’t take a lot of time or skill to make.
 As I was sitting with my granddaughter watching another episode of “Mickey and the Roadster Racers” on the Disney Junior channel, one of the various versions of their logo popped on the screen. For those of you who aren’t Disney Junior aficionados, the standard logo is red and black. But they occasionally have specialty logos, inspired by the different Disney characters. I’ve seen Toy Story, Winnie the Pooh, Doc McStuffins, Sofia, 101 Dalmatians, Finding Nemo…you get the idea.
And then it hit me like a ton of pixie-dust! I could use that same idea to create Disney May Baskets!
So, here’s how we made our Disney-inspired May Baskets:
One of the most popular (and easiest!) forms of a May Basket is a paper or plastic cup. To make our Disney May Baskets, we started with a 20-ounce clear plastic cup.
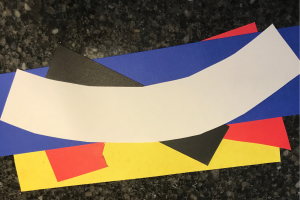 To decorate the “basket,” we used colored cardstock. Construction paper would work just as well, or even printer paper that you color. It doesn’t have to be fancy. It took a little trial and error to find a pattern that worked well for the cup. We finally settled on a shape that was a slight arc – it fit around the curve of the cup a little better than a strict rectangle strip. Our strips were about 10” long and about 5” inches wide. When we used two colors for a character, we narrowed the strips and glued them together so a finished product was about 5” wide. Size is really dependent on the cup you use, so just experiment with what works for you.
We placed the paper inside the cup, like a liner. This kept the project simple and avoided attaching the paper to the cup with glue or tape.
If you like, you can add a handle. Pipe cleaners work well. Just punch a hole in the side of the cup and attach. Ribbon or a paper strip would also work, or you can choose to not have a handle. If you’re really ambitious, try making ears for your basket!
You can fill your May Basket with whatever treats you desire. Popcorn, mini-marshmallows, goldfish, gumdrops, M&M’s, Skittles, or other colorful candy is popular. Flowers, stickers, tattoos, bubbles, sidewalk chalk, or even small toys make an extra special basket. Naturally, any basket with a Disney treat will be extra magical! Tinker Belle Diva shared how to make Jack-Jack’s Num Num Cookies, and Disney recently shared the recipe for churro-bites.
So, will you be making May Baskets? Ready to give them a magical Disney touch? I’d love to see your ideas and photos, and if you’re in the neighborhood, feel free to leave one on my doorstep!
If you’re looking forward to your next Disney trip, (whether it be Walt Disney World, Disneyland, or on the high seas with a Disney Cruise) let Patricia at All for Dreams Travel help you make it extra magical! Contact her for a FREE quote!
***Disclaimer – We at Tips from the Disney Divas and Devos hope you enjoy reading our articles and encourage you to share any you feel may be of interest to someone else. We do ask, however, if you choose to share the photographs attached to our articles, you give credit to the photographer. Thank you for your cooperation and sharing our love of Disney!
