By: Canadian Diva
Disclaimer: I purchased the following products on my own from Ulta Beauty online. We at Tips from the Disney Diva as writers, or the owner and myself are not affiliated with Luminess Cosmetics, Sir John – celebrity make up artist or Ulta Beauty. All opinions expressed are my own.
In anticipation of this summer’s live action remake The Lion King, the Walt Disney Company teamed up with world-renowned Celebrity Make Up Artist, Sir John, to create a captivating make up line with Luminess Cosmetics. Sir John has adorned the faces of so many stars and his most notable client is none other than Beyoncé, who also happens to be the voice of Queen Nala in the upcoming movie.
When I first heard that about this special edition make up collection, I became OBSESSED. I watched every promotional video and practically every YouTube channel Sir John has been in. I love hearing him talk (his voice is so soothing) to many YouTube Beauty influencers and studying how he works on their faces and creating gorgeous looks with The Lion King Make Up Collection. Sir John has said that this collection was inspired by his trip to South African. Visiting Africa and going on a Safari helped him create the vibrant colors in this make up collection, reminiscent of the beautiful landscapes he saw.
Diva Travel Tip: if you are visiting Walt Disney World Resort and Theme Parks, and want to experience all things The Lion King, see Marvel Diva’s tip here. And if you want to stay in a Lion King themed suite as well as be immersed in a Lion King themed resort, read Wishes Diva’s review of the Art of Animation, here.
Before I start talking about the collection, I want to let all you Disney fans know that I am not a professional make up artist. I am a busy, Disney Loving mom, like many of you. The reason why I’m telling you this is because if I can make these looks work on me, YOU CAN TOO! Throughout this article I will give you tips I learned, especially from watching Sir John’s interviews. I will also provide travel tips with this Make Up line which you could totally wear to Walt Disney World, Disneyland and on your next Disney Cruise vacation.
The Makeup Collection
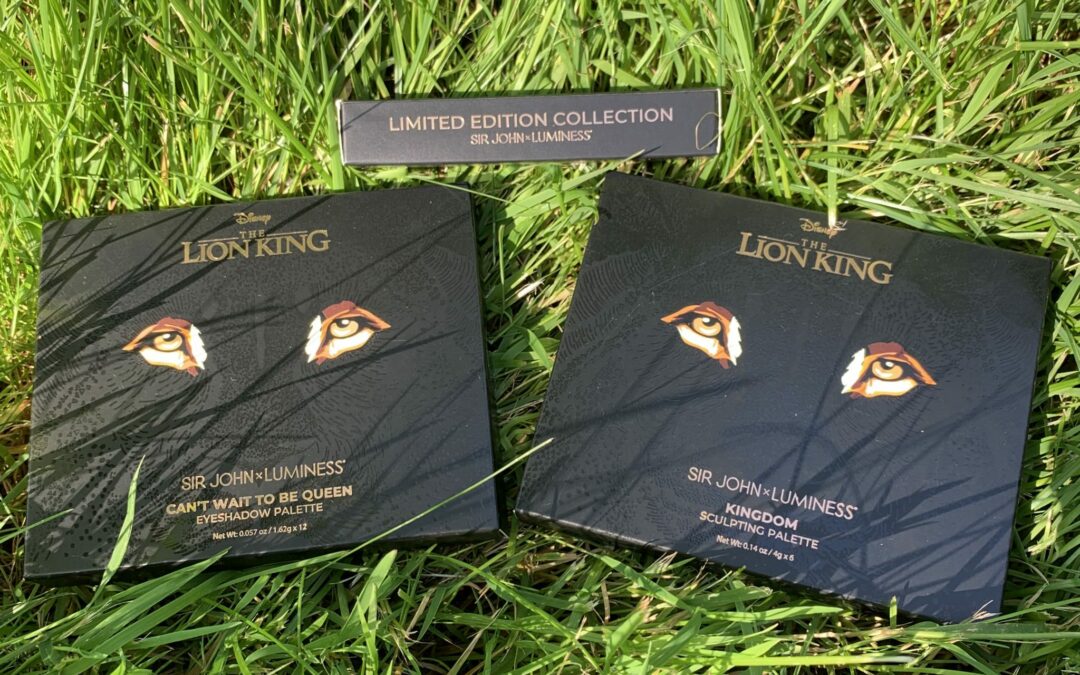
The Sir John x Luminess Cosmetics The Lion King Collection includes products that I would consider luxury at mid range level prices. With the quality of this collection, the price for each product is definitely worth it. This collection has an eyeshadow palette, a “sculpting” palette, a highlighter, a lip balm, 2 matte lipsticks and 2 liquid lipsticks.
I really wanted to buy the whole collection, but being a mom on a budget, I really had to edit what I needed and wanted.
What I bought…
I chose the “Can’t wait to be Queen” eyeshadow palette. The “Kingdom” sculpting palette and the “Hakuna Matata” lip balm which has a peach tone color. (Aren’t these names the best!?!)
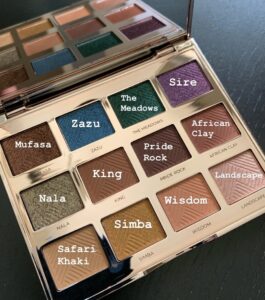
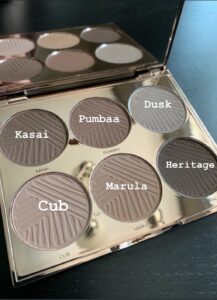
See below for the names of the colours in these palettes and reminisce about the classic Disney movie!
In the “Can’t Wait to be Queen” eyeshadow palette above, there are 12 colors: 5 matte shades, 5 shimmer shades and 2 satin shades. The lighter matte shades can be used as “transitional” colors which I will explain later in the article.
I really like what Sir John says in all his interviews about the “Kingdom” Palette, that it is a “sculpting palette” NOT a contouring palette. Sculpting has a more softer and seemingly less intimidating feel especially for moms like me who are not professionals at Make Up. It’s workable for us to “sculpt” our faces so that we look more awake and have more depth to our everyday appearance. And because this palette contains all matte cool tones, it will not give the impression of being over done and will also look great in photos too. Speaking of photos, on a Disney Vacation, families pay A LOT for Memory Maker! Pictures last a life time, so we might as well look our best with this easy to use, go to product.
Diva Beauty Tip: mix and match the varying shades in the sculpting palette according to your skin tone as well as how much you want add depth to your face. When you first apply it, use a light hand and a fluffier brush to get used to it, especially under your cheekbones. Once I got the hang of it, I started using a denser brush to sculpt my face.
Diva Travel Tip: These palettes and the lip balm are perfect for travel. They are not overly large or bulky, yet still big enough to have a variety of colours to choose from and create different looks while on vacation.
What I didn’t get…
These are products I didn’t buy, but hoping to in the future: “Circle of Life” highlighter, 2 Matte Lipsticks: a pinky nude called “Pounce” and a red orange named “Lion’s Mane”, as well as 2 Liquid Lipliners, a warm brown called “ Trouble” and a deeper red called “Romantic Atmosphere”. If I do get these products in the future, I will definitely update this review.
Beauty Tip: In many of the promotional videos for this make up line, Sir John says that all the lip colours can be used for multi-purposes like a cheek tint and even lightly on the eyes.
The Disney Details
If you are a Disney fanatic, you know how Disney puts such great details in everything. The Lion King Make Up Collection was definitely no exception. From just the box, with the beautiful embossed designed that reflects light so well, to the inside of the box pattern, plus fun quotes from the movie seen when you open the boxes. As you pull the product out, you will be in awe by the beauty of the packaging. The covers of the palettes look like many inlayed stripes to make the lion’s mane appear like it comes alive as you shift it back and forth in your hand.
The Luminess Cosmetics Team, explained about their unique and stunning packaging…
“The packaging was inspired by a scene in ‘The Jungle Book’ where the panther walks out of the cave and you only see the eyes, then we used an age old etching technique over rose gold metallic packaging to give the reflective medium dimension and the life. We used many colors and geometric patterns to give Simba and Nala form and structure…”
To see what Luminess Cosmetics mean, it’s best to see the packaging in person in order to view how it reflects light and gives a life-like feel. I am truly amazed by it.
The back of the palettes, is a reflective rose gold and inside you open up to a treasure of jewels of the eyeshadow palette. The sculpting palette has gorgeous cool tones in varying matte shades. Both palettes have a generous size mirror, which is great for on the go touch ups. The “Hakuna Matata” is a peach tone lip balm. It has a practical yet great design, with the “Tree of Life” on it – Animal Kingdom fans, you will get emotional (in a happy way) thinking of the Tree of Life at AK.

The packaging of all the products is gorgeous with a pretty pattern inside each box as well as a quote from The Lion King movie.
Quality is QUEEN
The quality of this line is fit for royalty. The eyeshadows and the sculpting powders are extremely pigmented. I have worn these for a full day. I also teach Karate and the eyeshadows have lasted on my eyes after hours of teaching.
Diva Beauty Tip: Make sure you wear an eyeshadow primer. Eyeshadow primers will prolong the wear of the eyeshadow especially under the hot Orlando sun.
Now for the 5 Disney Vacation looks I created from this palette…
Please note, my skin tone is currently a light- medium shade with olive/yellow undertones. In the winter I turn a lighter beige shade and in the summer I can become a darker medium tan.Sir John has said that this make up collection is created for ALL skin tones, quoting his signature saying, “from Harlem to Hong Kong”!
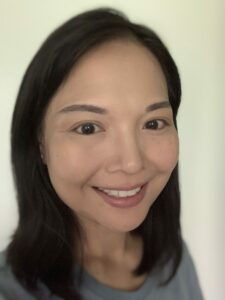
The No Make Up Make Up Look
When I was younger, I didn’t need make up everyday. But now in my mid-40’s, and a mom of a teen and 4 year old, I find make up really helps freshen up my appearance and I don’t look so tired. I also feel better when I have a bit of make up on daily. The following look is so easy and great for when I’m running errands or grabbing much needed coffee at the nearest café. It’s also a must for those extra early morning flights to MCO in Orlando, or if I am having a no Theme park day and chilling at our resort during our Disney Vacation. This look can take anywhere between 5-15 minutes.
- Slather on your favorite BB Cream, CC Cream or Tinted moisturizer, preferably with SPF
- For every look, I always like to do my eyebrows first, if you don’t need to and have full brows (lucky you), you can skip this step
- With your ring finger dab concealer under the eyes and then lightly place concealer on your lids to even out the color and prime for eyeshadow. You can use a separate eyeshadow primer but for those mornings when you have little time, a little concealer will do the trick.
- Dust a bit of loose powder under the eyes to set concealer and over eyelids (Sir John says in interviews that loose powder is better for setting concealer under the eyes than press powder)
- Take a fluffy eye shadow brush and use one of the transitional matte shades, I mixed “King” and “Safari”
- Sweep over eyelids
- Take sculpting palette, mix shades that are a bit darker than your skin tone
- Mix with brush into your hairline, sculpt your forehead and underneath your cheekbone to chisel out your cheeks
- Don’t forget your neck and under jawline
- For the nose, use a smaller brush, mix shades to desired tone and Sir John says to start from the eyes down to the tip of you nose
- Don’t forget to brush underneath your nose
- Put SPF lip balm on lips and the “Hakuna Matata” on top
- I dabbed a bit of “Wisdom” from the eyeshadow palette in my cheeks and blended with a blush brush
- You can also put “Hakuna Matata” Lip balm on your cheeks and blend with your fingers over your cheeks for a natural glowy look
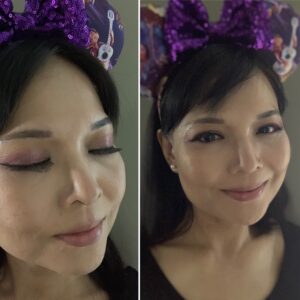
Purple Vibes
Recently at Walt Disney World and Disneyland, PURPLE was all the rage and still is! From almost every Disney Blogger posting a photo in front to the famous “Purple Wall” (like Pixie Dusted Diva’s family did here, ) to all things Disney Merchandise in this royal hue. “Sire” in the “Can’t Wait to be Queen” Palette is a shimmery deep purple eyeshadow with blue sparkles which would make anyone look majestic.
- Use a transitional shade first on your eyelids
- Pat on “Sire” with your finger lightly to figure out the shape you want
- Take the eyeshadow brush you used for the transitional shade and blend the top edge of the purple colour to give a gradient look
- I used “Nala” as an inner corner highlight
- Sir John gives a great tip about using the peach color “Wisdom” on the brow bone
- I like to line my eyes with a waterproof liquid eyeliner
- Sculpt face with the Sculpting palette, I also used “wisdom” on my cheeks as blush (after I put foundation and applied concealer) then blended it with a Blush Brush
- Because I don’t have the Highlighter palette, I used a bit of “Nala” on the tops of my cheekbone and on the tip of my nose
- You can put mascara to complete this look (I recommend a waterproof formula, especially going into the Disney Parks and especially if you plan on water attractions like Splash Mountain) but I personally prefer false lashes.
- For stronger eye looks, I do eyes first and then put a fuller coverage foundation, concealer and then powder.
- Don’t forget to spray your face with a make up setting spray to prolong the wear of your make up, especially if you are doing a full park day.
Diva Beauty Tip: My favorite setting spray is “All Nighter” by Urban Decay. If you are traveling by plane to your Disney Vacation Destination, they do have a travel size spray. Or you can do what I did and put it in a mini spray bottle. Don’t forget to label it!
The “Mickey Ears” I wear in this article are all from CREATIVE EARS. Read Pixie Dusted Diva’s review of Creative Ears here, Soarin’ Diva did a fun review here, and I also stated 6 reasons why you should get Creative Ears here.
Spaceship Earth Silver-BLUE Look
I wanted a more silver-blue color to match my “Spaceship Earth” Mickey Ears. “Zazu” in the “Can’t Wait to be Queen” palette looks very vibrant and deep in pictures and in the palette, yet when placed on, it’s a more shimmery softer blue. To make it even more softer with a gray undertone, I actually put the color “Dusk” from the sculpting palette on my eyelids first (after I primed my eyes).

Mixing “Zazu” from the eyeshadow palette and “Dusk” from the scuplting palette to create this silvery blue look.
- For the cat eye shadow look, take an angled eyeshadow brush, gauge where you will make the cat eye line
- Spray a setting spray on your brush, dip into “Zazu” and stamp at the corner of your eyes towards the tip of the outer edge of your eyebrow.
- With “Zazu”, color the rest of your eye to the shape. I like to use a very small eyeshadow brush and layer the colour on until I get the desired shade I want
- Because this look is more cool toned, I used the lighter shade from the “Kingdom” sculpting palette (not the eyeshadow palette) and brushed onto my brow bone
- I used waterproof liquid eyeliner to line my eyes and the outer edge to form the cat eye more as well as line underneath my eyes
- Follow steps above in terms of foundation and concealer
- Since this is a more muted, cool toned look, I added a pink blush from my make up collection to brighten up the face.
Diva Beauty Trick: put a bit lighter colored shimmer shadow on the very top of your lips then apply lip balm so that your lips have a serious plumped up pout.
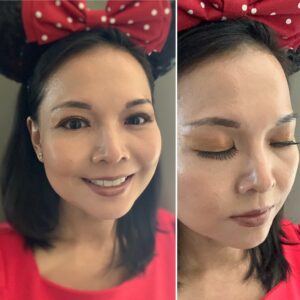
Classic Minnie Mouse Look
If you like to “Rock the Dots” and get your Minnie Mouse groove on, this Minnie inspired look is great with golden bronze look.
- Use a deeper transitional shade from the eyeshadow palette on the eyelids
- Basically using the eyeshadow technique as above (Powder Blue Look) to get the cat eye effect, using the “Simba” or if you are a deeper shade, “Mufasa”.
- Sweep a bit of the transitional shade under the eyes
- Use “Wisdom” on the brow bone
- Put eyeliner and mascara and/or false lashes to attain Minnie Mouse’s famous flattering fluttering eyes.
- You may want to add a bronzer on top of your sculpting for added dimension and color
Diva Beauty Trick: after putting “Hakana Matata” on my lips, I dabbed “Simba” all over my lips to add more deeper color and shimmer so it looks like I have a new lipstick!
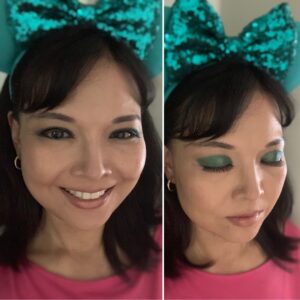
Emerald Green Eyes
I apologize if I may seem hyperbolic, but “The Meadows” is EVERYTHING! It was actually the eyeshadow color I was least interested to try but turned out to be my favorite. It will literally make your eyes pop and look like you have jewels on your eyes. I didn’t even need to use eyeliner as I lined my eyes with this luscious green all over. All I needed for my eyes were some false lases (or you can just put mascara) and BAM, instant glamor.
- Use your ring finger to gently pat “The Meadows” on the centre of your eyelids. Then what I did was take a concealer brush or any small eyeliner/eyeshadow eyeshadow brush draw the shape I want on my eyelids.
- Fill in the rest of shape with “The Meadows” and use the same small brush to line the bottom of your eyes
- Use a Q-Tip with eye make-up remover to erase any shadow outside the lines
- Blend a lighter tone transitional shade on top of the eyeshadow edge, and underneath your brows to blend a little but not too much as you don’t want to lose the shape or stark colour effect
- I’ve seen Sir John use this technique where he would use a make-up wipe after the eyes are done, underneath the eyes to clean up any shimmer and make a cleaner look. Then he would use eye cream under the eyes and apply foundation and then concealer. This works so well to make your look more polished especially with such a bold eye.
- Sculpt your face, but for this look, not too heavy as the eyes are the centre of attention.
- Very little blush or just a dab of blended “Wisdom” eyeshadow on cheeks for a bit of color
- Use “Hakuna Matata” lip balm on lips
Diva Beauty Trick: to give a bit more colour, but not too much for this look, I dabbed a bit of “Landscape” shimmer eyeshadow in the centre of my lips and blended out.
More Diva Beauty Tips: If you want a more simple look, just dab “The Meadows” on top of your eyelid to fame your eyes without going over to the crease. It could look like just eyeliner and will make your eyes shine with minimal effort.
Any Cons of this Pro(fessional) Line?
I feel this line is pretty near perfect but if I had to say any cons, here are the following…
I would have loved to see the “Circle of Life” Highlighter Palette include a Blush with it. Or make the Highlighter Palette like they designed the “Kingdom” Sculpting Palette, with 3 blush shades and 3 different highlighter shades. However, I still would like to buy their “Circle of Life” Highlighter in the future.
Also, many people may think this line is a bit out of their price range compared to other Disney Make Up collaborations. I believe that’s why it makes The Lion King Make Up Collection a bit more exclusive. I personally feel this collection is a very luxurious, great quality and special keepsake product, so for these reasons, the higher price is worth it for me.
Do you love make up? Are you interested in getting this limited edition make up line or do you have it already? Which of the 5 easy looks above will you try your next Disney Vacation? Let us know and show us your look by tagging us on Instagram, Facebook and Twitter.
The Lion King Movie is in theatres on July 19, 2019. The Lion King make up line is available on the Luminess Cosmetics website and on the Ulta Beauty website (search Global if you do not live in the USA like myself, but please note that Ulta may not deliver to your country so contact them before purchasing). Some products are available in Ulta Stores beginning July 1, 2019. Please be reminded that this is a capsule collection and may not be available in the future for purchase.
***Disclaimer – We at Tips from the Disney Divas and Devos hope you enjoy reading our articles, and encourage you to share any you feel may be of interest to someone else. We do ask, however, if you choose to share the photographs attached to our articles, you give credit to the photographer. Thank you for your cooperation and sharing our love of Disney!
Are you ready to start planning your magical vacation, but you aren’t sure where to start? Contact our recommended travel agent, Patricia at All Dreams for Travel, and she can do all the work for you. Best of all, all of her services are FREE, all you have to do is click here to request a quote!
